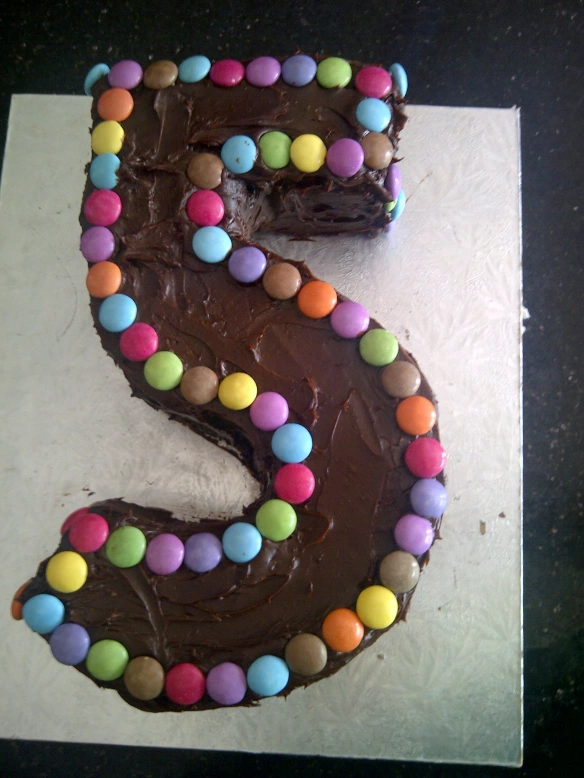
This isn’t really a specific recipe as I use a standard 4 egg victoria sponge recipe. I started making number cakes when my boys were very young. Initially I hired the tins but the combination of a full time job and young children made it difficult to get the tins back on time so I started to buy the numbers as I needed them. Children love these cakes, especially when they are allowed to decorate them with sweets. I usually do chocolate with chocolate fudge icing as shown above but white icing and dolly mixtures also work well. The cakes are also popular with adults for significant birthdays. I made a ‘2’ and a ‘1’ for one of my nephews using chocolate fudge icing that I got as smooth as possible then dusted with gold dusting powder. I also made a ‘7’ and a ‘0’ for my sisters father in law with one number as a chocolate cake and the other vanilla sponge. The number ‘5’ above is for my youngest niece. As a busy mum one of the things I liked about using these tins is I didn’t need to spend too much time getting icing perfect.
The most time consuming/fiddly part is lining the tin!
Ingredients for Victoria Sponge
- 225g unsalted butter, very soft
- 225g caster sugar
- 1 teaspoon vanilla extract
- 4 large eggs
- 200g self-raising flour (if making chocolate substitute 4-6 tbsps flour for cocoa powder)
- 25g cornflour
- 1 teaspoon baking powder (if using processor method)
- 3-4 tablespoons milk
Instructions for Victoria Sponge
- Preheat the oven to 180C / gas mark 4.
- To make this basic sponge cake in the food processor: put all the ingredients except the milk in the food processor and process till you’ve got a smooth batter. Then pulse, pouring the milk gradually through the funnel till your cake mixture’s a soft, drooping consistency.
Chocolate Fudge Icing
I’ve put the quantities for Delia’s chocolate fudge icing from her Delia’s Complete Cookery Course below, I usually make double for a number cake but have plenty left over, I could probably get away with 1.5 times.
Ingredients for Chocolate fudge icing
- 75g granulated sugar
- 75ml evaporated milk
- 100g dessert chocolate
- 40g butter
- 2 drops vanilla essence
Instructions for Chocolate Fudge icing
- To do this, combine the sugar and evaporated milk in a heavy saucepan. Heat gently to dissolve the sugar, stirring frequently. When the sugar has dissolved and the mixture comes to the boil, keep the heat very low and simmer for 6 minutes without stirring.
- Remove the pan from the heat and, using a small balloon whisk, whisk in the chocolate, followed by the butter and vanilla extract.
- Transfer the mixture to a bowl and, when it is cool, cover it with clingfilm and chill for about an hour to allow the mixture to thicken.
- Then beat again, and spread on sponge. Covering a number cake takes a while and you need to be careful to make sure all edges are covered as it’s easy to miss some.
- The first thing you notice about the tin is that it is open both sides so you need to place it on a baking tray to bake the cake. You need to start by greasing and lining the baking tray.
- Then cut a piece of baking parchment or greaseproof paper the size of the frame allowing at least a 2-3cm border all round.
- Cut strips of baking parchment or greaseproof paper wide enough to line the inside of the frame. You don’t need to do one long strip, you can do several which makes it easier to position them. Place the frame, making sure the number is reversed, on the paper and trace round the inside of the frame.
- Draw your cutting line around the tracing allowing at lease 2cm all the way round.
- Cut out carefully and then snip the border at about 2cm intervals from the outside edge to the tracing line. Where the shape changes direction make sure that you cut into the angle.
- Fold in the flaps. Where there is a curve it may be necessary to add a few snips.
- Grease the number frame and position it with the number reversed.
- Ease the tracing into the frame pressing the paper onto the greased surface of the baking sheet and the flaps onto the greased side of the frame.
- Press the paper strips onto the greased side of the frame, overlapping where necessary and using a little more butter to stick the overlaps.
- The frame is now ready to be filled with cake mixture. There is a little bit of a knack to filling the frame. It is less obvious on this tin but the cake mixture rises more in the middle of the wider parts of the tin so I dip the mixture a little in the middle with a slightly deeper dip the wider the tin.


